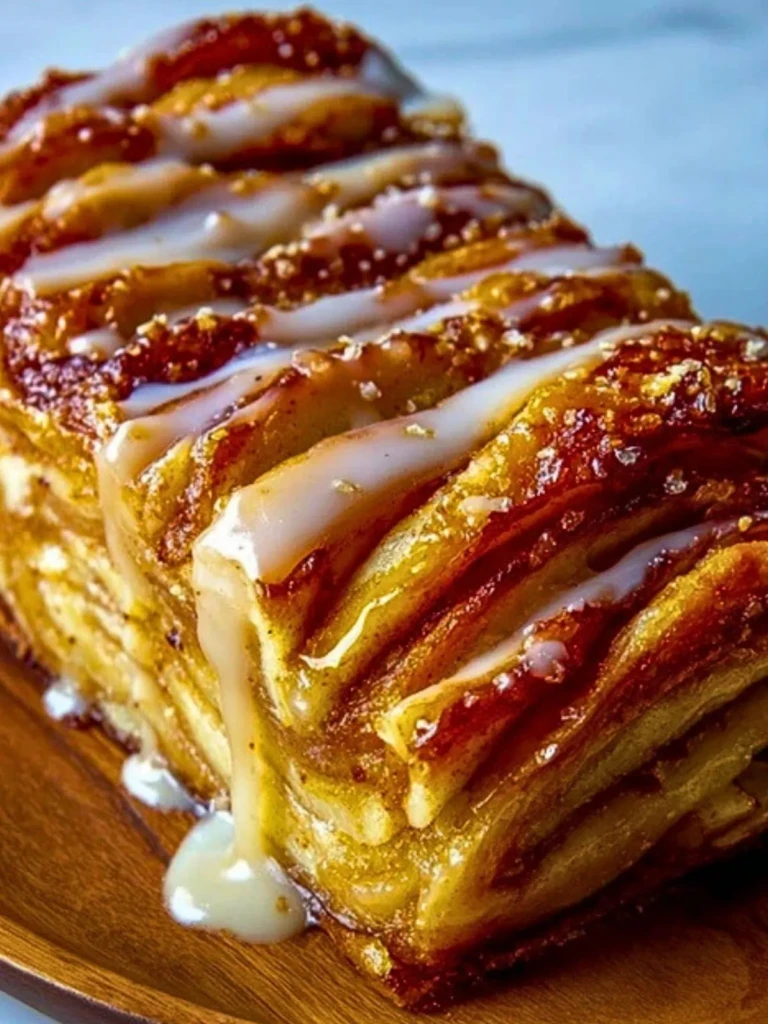
There are few pastries that stop people mid-sentence the way this Apple Kringle does. Golden, crackly layers of laminated dough, spiced apple filling tucked inside like a secret, and a vanilla bean glaze drizzled over every caramelized ridge — this is not your standard bakery fare. It’s elegant, indulgent, and shockingly easy to serve warm from your own oven.
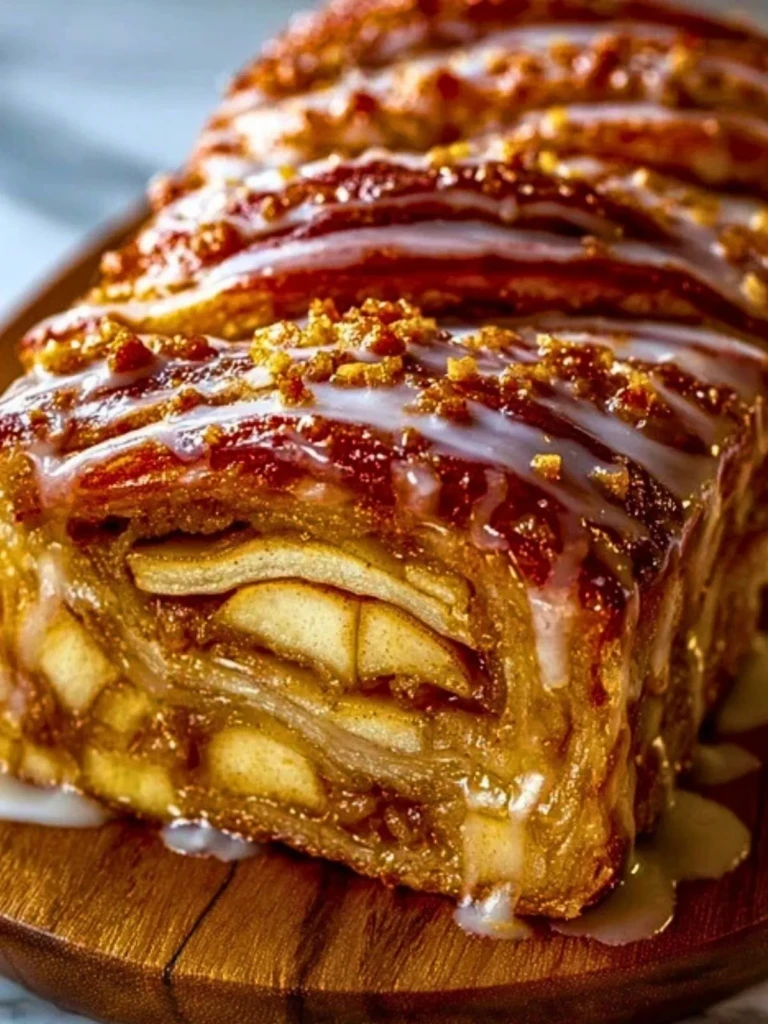
I’ve made this kringle for weekend brunches, Christmas mornings, and late-night dessert boards. Each time, someone pulls me aside and says, “You really made this from scratch?” The layers speak for themselves. The apples cook down into this rich, spiced compote, layered between buttery folds of dough that puff and shatter with every bite.
What makes my version different is the layering technique I use — not full croissant-style lamination, but a shortcut that still delivers big on texture. Plus, I use tart-sweet apples spiced with cinnamon and nutmeg, and I finish with a glaze made from real vanilla bean paste. It’s one of those recipes where every element feels thought-out, yet nothing is fussy.
“I made your Apple Kringle for my family over the holidays and everyone swore it came from a bakery! The crust was perfect and that glaze — wow.” — Jennifer M., Wisconsin

What Makes This Apple Kringle Stand Out
This isn’t just a puff pastry stuffed with apples — it’s a structured pastry with intentional layering, smart spice balance, and a sweet crackle crust that almost candy-coats the top. The first bite hits with crisped caramelized sugar, then gives way to tender layers of spiced apple and buttery dough. The finish? A warm vanilla glaze that sets softly as it cools.
One of the main upgrades here is the dough technique. Traditional kringle doughs can be dense or overly bready. I bypass that by using a hybrid laminated dough — it’s quicker than full lamination, but the layering still creates those shattering edges. If you’ve ever made rough puff, you’ll feel right at home.
Each layer of apple is thinly sliced and lightly cooked down before assembly. That extra step ensures that they won’t leach excess moisture into the dough and ruin the structure. As for the topping — turbinado sugar mixed with a touch of salt gives a sparkle and crunch that holds its own against the glaze.
You don’t need to be a pastry expert to make this. If you can roll dough and slice apples, you’re already most of the way there. I use a simple French rolling pin and a good pastry brush. Everything else? Just time, temperature, and a bit of patience.
Puff Pastry vs. Homemade Dough – Which Is Better?
Let’s talk about one of the first decisions you’ll make: Should you use store-bought puff pastry, or make a homemade dough from scratch?
I’ve used both, and here’s my take. Store-bought puff pastry will absolutely work if you’re in a pinch — I recommend Dufour for its rich, all-butter base. But if you’re after that flaky-crisp edge and slightly chewy center, my shortcut laminated dough gives you much better results in terms of both structure and flavor.
In my notes: Store-bought puff pastry tends to puff more dramatically, sometimes at the expense of cohesive layering. It’s light, but can feel hollow and overly delicate once filled. Homemade dough has a sturdier bite — still tender, but with enough density to hold warm apple filling without sogginess.
Another factor? Control. With homemade, you get to regulate butter quality, salt levels, and folding technique. I chill my dough after every turn, and that consistency gives me reliable rise and golden edges every time. If you’ve got 90 minutes to spare, go homemade. If not, Dufour is your best backup.
In short — you can go either way, but homemade is worth the extra time when you want it to really shine.
Why I Recommend 2 Cups of Thinly Sliced Apples, Pre-Cooked
Too many kringle recipes go wrong by overstuffing with raw apples that release water and deflate the whole pastry. I use exactly 2 cups of thinly sliced Honeycrisp or Pink Lady apples — sautéed just until they start to bend. That step alone keeps the filling stable and prevents soggy bottoms.
I tested everything from raw to fully caramelized fillings. The sweet spot? Pre-cooked with brown sugar, cinnamon, and a pinch of salt until just tender. They shouldn’t be mushy — you want them to retain some structure so they bake up sliceable and defined.
Use the Right Pan for Best Results
I’ve baked this in everything from glass pie dishes to rimmed sheet pans, but a standard metal loaf pan gives the best vertical rise and heat conduction. Glass pans tend to bake slower and can leave you with pale bottoms. Metal allows for even browning and crisps up the edges without overbaking the center.
My go-to is a USA Pan nonstick loaf — it releases the pastry cleanly, even if a bit of glaze runs over.
The Glaze: Warm, Luscious and Never Skipped
That vanilla glaze might look optional — but don’t even think about skipping it. It ties the whole pastry together, softening the sugar crust just enough and adding a floral sweetness right at the finish.
I’ve tried this recipe without the glaze once. Never again. It felt like the whole top layer was missing a note. I use 1/2 cup powdered sugar, a splash of cream, and a full teaspoon of vanilla bean paste. Drizzle while the kringle is still warm so it melts slightly and sets into the crevices.
How to Bake for a Crisp Exterior and Soft Center
Start with a chilled dough. That’s rule number one. I roll it out to just under 1/4 inch thick on a lightly floured surface, layer in the cooled apple filling, fold it like a letter, and transfer it to a parchment-lined metal loaf pan.
Bake at 375°F for 35 to 40 minutes, rotating halfway through. The top should be a deep golden brown and puffed — don’t pull it early or you’ll miss that final caramelization. If the top is browning too fast, tent it with foil at the 25-minute mark.
Visual cues are your best friend here: the edges should look deeply crisp and the center should feel set when gently pressed. You’ll hear a faint crackle if you tap the crust — that’s when you know it’s right.
Rest the kringle in the pan for 10 minutes after baking, then lift it out to cool slightly on a wire rack. This helps maintain bottom crispness and avoids steaming the interior.
I’ve rushed this step before and ended up with a collapsed center. That cooling time is non-negotiable for clean slices and layered structure.
How Long It Lasts and How to Store This Apple Kringle
This kringle is best served warm — that’s when the glaze is still a little molten and the pastry is at peak contrast. But it holds up surprisingly well for 2 to 3 days.
I keep it at room temperature the first day, loosely covered in foil. After that, it goes in an airtight container and into the fridge. Reheat slices in a toaster oven at 300°F for 5 to 7 minutes — you’ll get most of that crispness back without drying the inside.
You can freeze this too. Wrap tightly in plastic and foil, then freeze for up to a month. Thaw overnight in the fridge and refresh in the oven the same way.
Other Pastries I Bake Just As Often
When I’m not making kringle, I’m usually baking my Maple Pecan Danish, which uses a similar dough with a nutty, maple-forward filling. My Cinnamon Sugar Pull-Apart Bread is another go-to — especially for brunch crowds.
I also love a good Savory Cheese Twist made with gruyère and puff pastry, and for fruit-forward options, my Roasted Pear Galette is right up there. These all play with dough structure and balance of sweetness in different ways.
Pin This Recipe and Come Back to It Anytime
Save this to your Holiday Baking or Cozy Fall Mornings Pinterest board. I’d love to know — did you use puff pastry or make your own dough? Did you go heavy on the glaze or keep it light?
Tag me in your bakes or leave a comment on your twist. I always read them, and I love seeing how each version turns out.
Equipment Notes That Make a Difference
USA Pan Loaf Pan: Ensures even browning and easy release.
French Rolling Pin: Gives better control when rolling thin layers.
Pastry Brush: Essential for egg wash and glazing precision.
Apple Kringle
- Total Time: 1 hour 5 minutes
- Yield: 1 loaf (serves 6–8)
- Diet: Vegetarian
Description
A stunningly layered Apple Kringle with crisp, caramelized edges, spiced apple filling, and a luscious vanilla bean glaze. This shortcut laminated dough gives bakery-level results with approachable steps and tested technique.
Ingredients
2 cups thinly sliced Honeycrisp or Pink Lady apples
2 tablespoons unsalted butter
3 tablespoons light brown sugar
1 teaspoon ground cinnamon
1/8 teaspoon salt
1 sheet homemade rough puff pastry or 1 sheet Dufour puff pastry, thawed
1 egg, beaten (for egg wash)
2 tablespoons turbinado sugar (for topping)
1/2 cup powdered sugar
1 tablespoon heavy cream
1 teaspoon vanilla bean paste
Instructions
1. Preheat oven to 375°F. Line a metal loaf pan with parchment paper.
2. In a skillet over medium heat, melt butter. Add apples, brown sugar, cinnamon, and salt. Cook 4–5 minutes until just tender. Let cool.
3. Roll chilled dough to just under 1/4 inch thick on a lightly floured surface.
4. Spread apple mixture evenly in center third of dough. Fold like a letter: left over center, then right over that.
5. Carefully place folded pastry into the prepared loaf pan, seam-side down. Brush top with beaten egg.
6. Sprinkle turbinado sugar over top. Bake for 35–40 minutes, rotating halfway through. Tent with foil if browning too quickly.
7. Check for doneness: top should be golden brown and edges puffed. A tap should sound crisp.
8. Let kringle rest in pan for 10 minutes, then lift out to cool slightly on a wire rack.
9. While warm, whisk powdered sugar, cream, and vanilla bean paste until smooth. Drizzle over kringle.
10. Slice and serve warm, or cool completely and store as directed.
Notes
Use only lightly cooked apples to avoid excess moisture in the dough.
Resting the kringle before slicing ensures layers don’t collapse.
Drizzle glaze while warm so it sets into the top crevices beautifully.
- Prep Time: 25 minutes
- Cook Time: 40 minutes
- Category: Pastry
- Method: Baking
- Cuisine: American, Danish-inspired
Nutrition
- Serving Size: 1 slice
- Calories: 312
- Sugar: 16g
- Sodium: 118mg
- Fat: 19g
- Saturated Fat: 12g
- Unsaturated Fat: 5g
- Trans Fat: 0g
- Carbohydrates: 35g
- Fiber: 2g
- Protein: 3g
- Cholesterol: 52mg
Keywords: apple kringle, holiday pastry, laminated dough