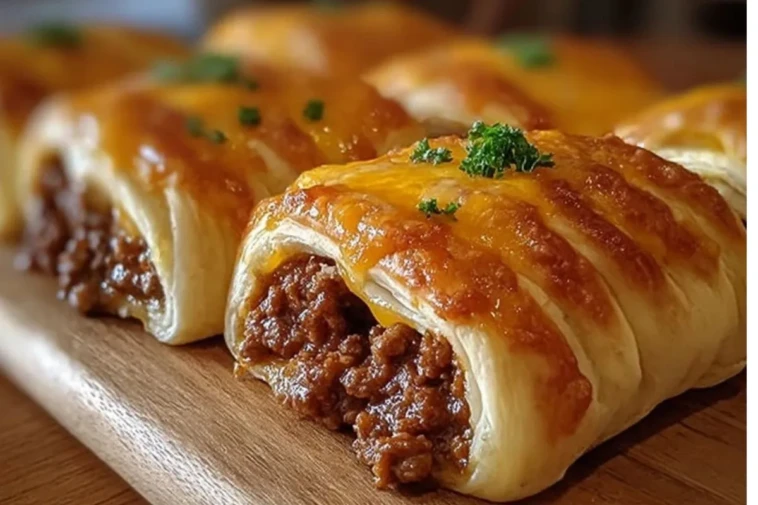

I’ve never brought these Cheesy Beefy Rolls to a party and had leftovers. Never. Between the buttery crunch of the pastry and the rich, savory beef filling, they hit every note of comfort food—while still feeling just elevated enough for a crowd. This recipe has become my go-to for potlucks, casual dinners, and yes, even as a make-ahead freezer snack for my kids.
What makes this version different from the usual beef pastries? For one, I’m not shy with the cheese. I fold sharp cheddar right into the pastry top so you get that bubbly, golden crust every time. The beef filling is seasoned like a cross between a taco and a meat pie—think warm spices, onions, a touch of tomato paste for depth, and just enough sauce to keep it juicy but not soggy.
I first served these at a football Sunday get-together, and since then they’ve become a staple. The trick was nailing that meat-to-pastry ratio—too much filling and the pastry can’t puff, too little and it feels stingy. After multiple test batches (including a few tragic soggy-bottoms), this version delivers exactly what you want: flaky pastry, meaty filling, and a hit of melty cheese on top.
“I made your cheesy beefy rolls for my book club and they disappeared in minutes! Everyone asked for the recipe.” — Tanya M.
The details matter here—how the beef is browned, when the cheese is added, how the pastry is chilled—and I’ll walk you through all of it. Because once you taste these, you’ll be making them on repeat too.
What Makes This Cheesy Beefy Rolls Recipe Stand Out
This isn’t your average meat puff. Most beef rolls you find are either too greasy, too bland, or the pastry gets lost in the filling. What makes this recipe stand out is how each component is carefully balanced and technically optimized.
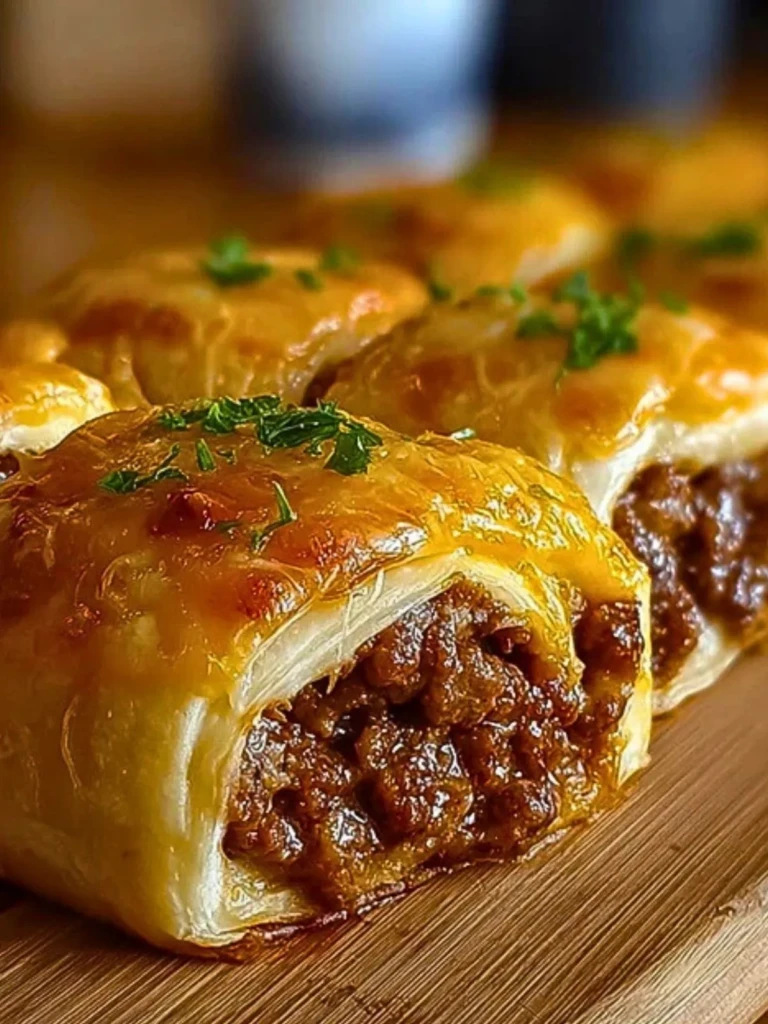
Let’s start with the filling. I use lean ground beef so it doesn’t flood the pastry with grease, and cook it down with onion, garlic, tomato paste, Worcestershire sauce, smoked paprika, and a pinch of brown sugar. The end result? A rich, deeply savory filling that holds together without being pasty.
The pastry is store-bought puff pastry, but with a twist—I brush the top with egg wash and sprinkle on grated sharp cheddar before baking. This gives you a deeply golden, cheesy crust that crackles when you bite in. I’ve tested both homemade and pre-made pastry here, and unless you’re a puff pastry wizard, stick with the frozen sheets. Pepperidge Farm and Dufour both work beautifully.
Skill-wise, this recipe is solidly beginner-friendly with one key requirement: follow the chilling steps. If the pastry gets too warm, it loses structure and you’ll lose the puff. A baking sheet, sharp knife, silicone brush, and a parchment-lined pan are your best friends here. I use a rimmed Nordic Ware aluminum sheet for even heat distribution.
And when it all comes together, what you get is a roll that’s buttery, cheesy, meaty—and never soggy. That’s what makes it special.
Puff Pastry vs. Homemade Dough – Which Is Better?
Let’s talk about one of the first decisions you’ll make: store-bought puff pastry or homemade dough? I’ve worked with both extensively, and there’s a clear winner for this specific recipe.
In my notes: Homemade dough can taste fantastic, but it doesn’t give you the flaky, towering layers that make these rolls feel indulgent. It also takes significantly more time and temperature precision. Puff pastry, especially the good frozen kind, gives you that shattering, buttery finish with no fuss. Pepperidge Farm gives consistent results, but if you want a slightly richer flavor, Dufour’s all-butter version is a step up.
Another factor: yield and handling. Puff pastry sheets come pre-measured and roll out evenly, making it easy to portion and fill. With homemade, every batch behaves a little differently—and that inconsistency can mess with the cheese browning and final rise.
Unless you’re going for an all-from-scratch baking day, stick with frozen puff pastry. It performs better in the oven, saves hours, and lets the focus stay on the filling and cheese, where the real magic happens.
Why I Recommend 1/2 Cup Sharp Cheddar Per Sheet
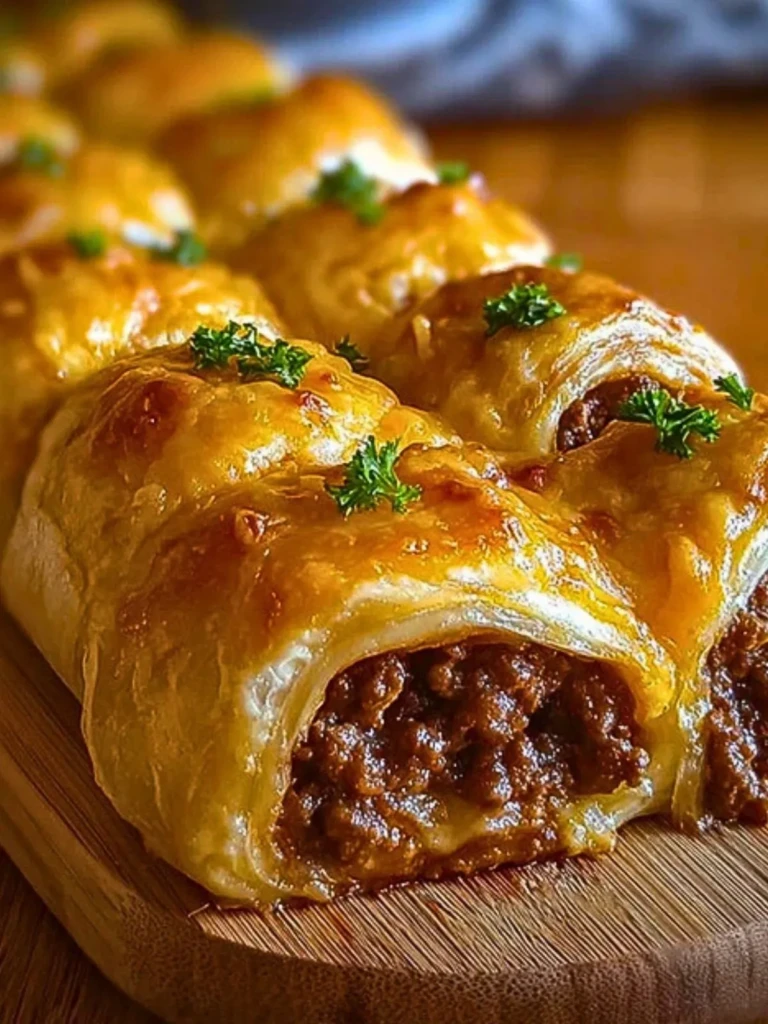
Cheese isn’t just a topping here—it’s part of the identity of these rolls. After testing everything from pre-shredded blends to fresh-grated blocks, I found that 1/2 cup of sharp cheddar per sheet of puff pastry hits the sweet spot.
In my tests with more cheese, the tops became greasy and the pastry didn’t rise as high. Too little, and you miss that cheesy bite that contrasts with the savory beef. Sharp cheddar brings tang and saltiness that balances the richness without making it cloying. I grate it fresh from a block—Tillamook or Cabot are my go-to’s for full flavor and melt quality.
I sprinkle the cheese after the egg wash and press it gently into the pastry. It melts into the crust and creates that bubbly, golden top that practically begs to be bitten into. Don’t skip the fresh grind of black pepper right before baking either—it adds a subtle sharpness that wakes everything up.
Use the Right Pan for Best Results
I’ve baked these rolls on everything from cookie sheets to pizza stones, and the winner by a mile is a rimmed aluminum baking sheet lined with parchment. It distributes heat evenly and helps the bottoms crisp up without burning.
Avoid glass or dark nonstick pans. Glass overbakes the bottoms before the tops are golden, and dark nonstick can burn the cheese before the pastry is done. I use a Nordic Ware Naturals half sheet—it’s durable, lightweight, and browns like a dream.
The Cheese Topper: Bubbly, Salty, and Never Skipped
I’ve tried this recipe without the cheese topper once. Never again. That melted cheese layer isn’t just for looks—it’s critical for texture and flavor. You get crunch, salt, umami, and a little bit of chew right at the top.
Technique-wise, press the cheese into the egg-washed surface so it adheres well. Bake until the cheese is deeply golden and blistered—not just melted. That color equals flavor, and it locks in the structure of the roll underneath.
How to Bake for a Flaky Crust and Juicy Filling
This recipe is all about timing and temperature. I bake the rolls at 400°F for 22 to 25 minutes, straight from the fridge. No shortcuts here—chilling the filled rolls for at least 15 minutes before baking is key. It re-solidifies the butter in the pastry so you get those high, flaky layers.
Use a parchment-lined rimmed baking sheet, and give each roll at least an inch of breathing room. That airflow helps the sides brown evenly. I use the middle rack to prevent burning the cheese but still get that golden underside.
You’ll know they’re done when the tops are deeply golden, the cheese is blistered, and the bottoms sound crisp when tapped. If the pastry looks pale, give it a few more minutes—underbaking leaves you with limp layers.
Let them rest at least 10 minutes before serving. This lets the filling firm slightly and avoids burning your mouth with molten beef. I also find the flavor blooms more after a short rest—something about that pause brings everything together.
And if you make these ahead, you can freeze the unbaked rolls and bake straight from frozen—just add 5 minutes to the total time. It works like a charm.
How Long It Lasts and How to Store This Cheesy Beefy Rolls Recipe
These rolls are best warm, fresh out of the oven—but they hold up surprisingly well. Once baked and cooled, you can store them in an airtight container in the fridge for up to four days. I layer them between sheets of parchment to keep the cheese from sticking.
To reheat, pop them in a 350°F oven or toaster oven for 8 to 10 minutes. The microwave works in a pinch, but you’ll lose that crispy crust. If you’re freezing, do it before baking. Assemble, chill, then freeze on a tray until solid. Transfer to a freezer bag and bake from frozen at 400°F—they’ll need about 30 minutes.
In terms of serving, I love them with a dollop of sour cream or a dash of hot sauce. They also make a perfect handheld lunch with a side of pickles or slaw. The texture stays tender inside and crisp outside for a full day post-baking—after that, the pastry starts to soften.
Other Savory Bakes I Make Just As Often
If you love these Cheesy Beefy Rolls, you might want to try my Sausage and Cheddar Breakfast Hand Pies—they use a similar puff pastry base with a more breakfast-friendly filling. I also keep Chicken Spinach Puffs in the rotation—they’re great with feta and a brush of garlic butter.
Another staple in my freezer: Spicy Black Bean Empanadas with a cumin-lime crust. For something heartier, my Mushroom and Gruyère Galette layers caramelized onions and cheese in a rustic tart that eats like a meal.
Pin This Recipe and Come Back to It Anytime
I’ve added this one to my “Comfort Bake Staples” Pinterest board, and it’s one of my most-shared. If you try it, I’d love to know: did you use sharp or mild cheddar? Any spicy additions to the beef mix? Tag your version so I can see it!
Trust me, once you make these, they’ll go straight into your repeat folder. And if you’re feeding a crowd? Better double the batch.
Print
Cheesy Beefy Rolls Recipe
- Total Time: 55 minutes
- Yield: 6 rolls
Description
Flaky puff pastry stuffed with rich, spiced ground beef and topped with golden bubbly sharp cheddar cheese—these Cheesy Beefy Rolls are the perfect savory bake for parties, lunches, or make-ahead freezer meals. Crisp on the outside, juicy inside, and totally crowd-approved.
Ingredients
1 pound lean ground beef
1 tablespoon olive oil
1 small onion, finely diced
2 cloves garlic, minced
2 tablespoons tomato paste
1 tablespoon Worcestershire sauce
1 teaspoon smoked paprika
1 teaspoon brown sugar
1 teaspoon salt
1 teaspoon ground black pepper
2 sheets frozen puff pastry, thawed
1 cup sharp cheddar cheese, grated
1 egg, beaten (for egg wash)
1 tablespoon milk (to mix with egg wash)
Freshly ground black pepper (for topping)
Instructions
1. Heat olive oil in a skillet over medium heat. Add onion and cook until soft, about 4 minutes.
2. Add garlic and cook for 1 minute.
3. Stir in ground beef and cook until browned, breaking it apart with a spoon.
4. Add tomato paste, Worcestershire sauce, paprika, brown sugar, salt, and pepper. Cook until thickened, about 3–5 minutes. Let cool.
5. Roll out puff pastry sheets slightly. Cut each sheet into 3 rectangles.
6. Spoon cooled beef mixture down the center of each pastry rectangle, leaving space at the edges.
7. Fold over and seal the edges with a fork. Chill filled rolls for 15 minutes.
8. Preheat oven to 400°F. Line a baking sheet with parchment.
9. Brush tops with egg wash (egg + milk).
10. Sprinkle 1/2 cup grated sharp cheddar per sheet evenly over rolls.
11. Press cheese lightly into pastry and add fresh black pepper on top.
12. Bake rolls on the center rack for 22 to 25 minutes, or until puffed and golden with crisp, blistered cheese tops.
13. Let rest 10 minutes before serving.
Notes
Use freshly grated cheddar for best melt and flavor.
Chill filled rolls before baking to ensure flaky pastry layers.
Freeze unbaked rolls for quick snacks later—bake straight from frozen.
- Prep Time: 30 minutes
- Cook Time: 25 minutes
- Category: Savory Bakes
- Method: Baking
- Cuisine: American
Nutrition
- Serving Size: 1 roll
- Calories: 420
- Sugar: 3g
- Sodium: 480mg
- Fat: 27g
- Saturated Fat: 13g
- Unsaturated Fat: 12g
- Trans Fat: 0g
- Carbohydrates: 27g
- Fiber: 1g
- Protein: 17g
- Cholesterol: 75mg
Keywords: beef puff pastry rolls, cheesy meat rolls, savory snack