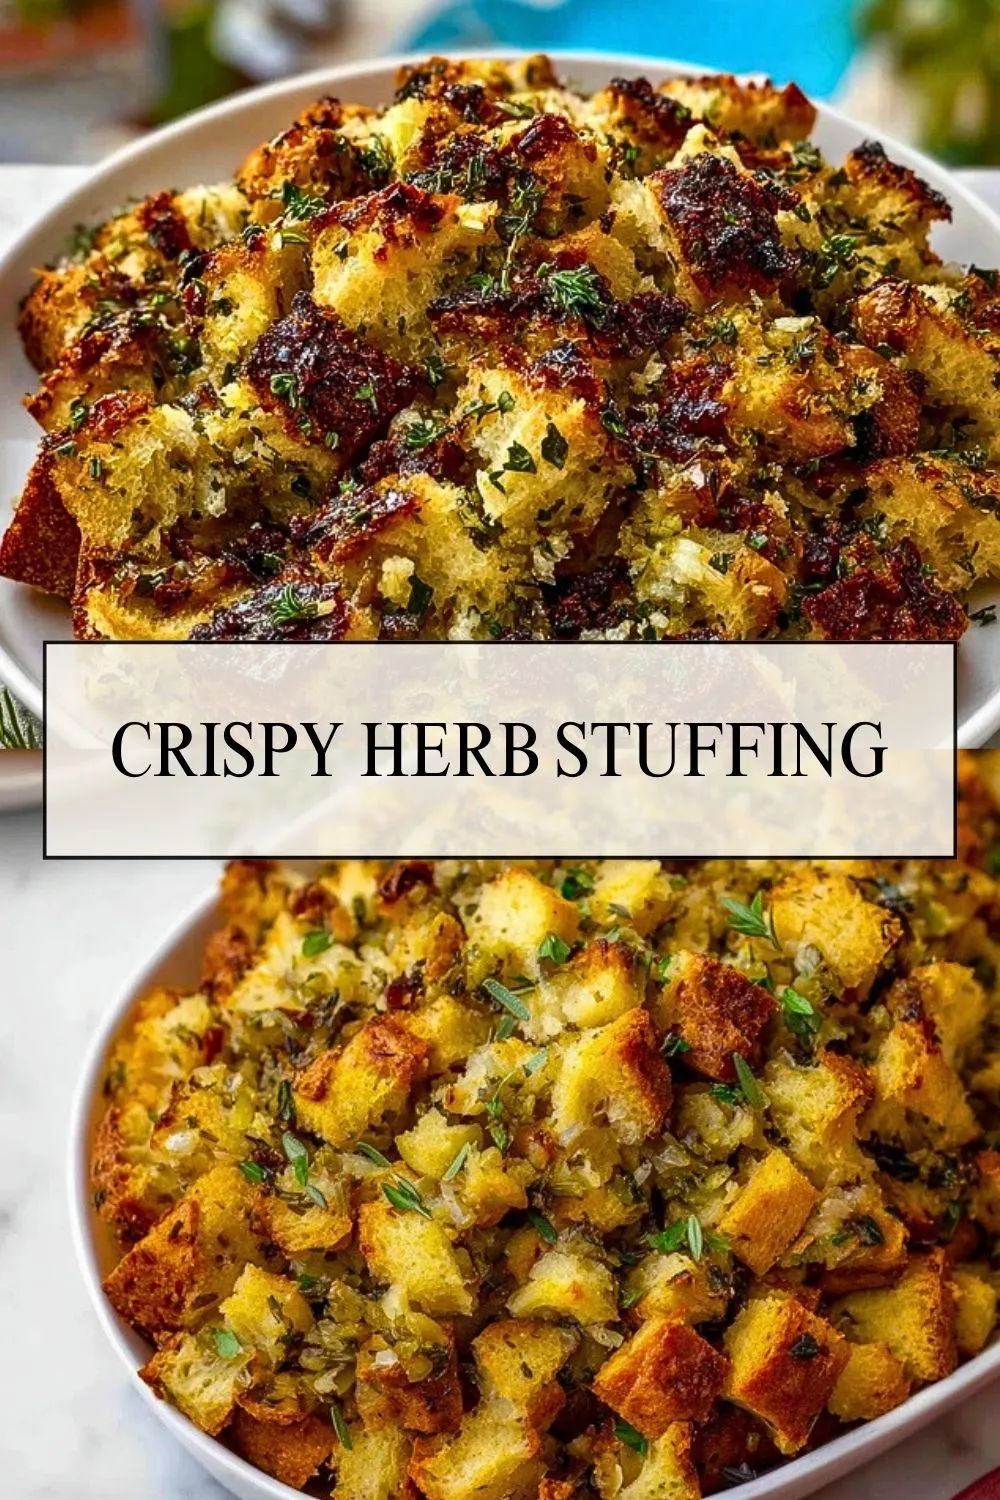
Golden, crunchy, and deeply aromatic, this Crispy Herb Stuffing is not just a side dish—it’s the kind of recipe that quietly steals the spotlight at any table. With rustic bread cubes toasted to perfection, caramelized onions, and an infusion of fresh herbs, each bite is a savory celebration of texture and flavor.

Whether you’re planning a holiday feast or simply elevating a cozy Sunday dinner, this stuffing delivers comfort with just the right amount of crispy edges and soft herbed centers. It’s straightforward, made from pantry staples, and yet tastes like something lovingly crafted over generations.
Why You’ll Love This Crispy Herb Stuffing
- That unbeatable mix of crunchy top and tender center.
- Layers of real flavor from slow-cooked aromatics and fresh herbs.
- A versatile side dish that pairs with almost any protein.
- Can be prepped ahead and baked fresh.
- Cozy, nostalgic, and completely crave-worthy.
What Kind of Bread Should I Use?
The key to great stuffing lies in using a sturdy, crusty bread. Think sourdough, French, or Italian loaves. The bread should be dried out (either air-dried overnight or oven-dried) to ensure it soaks up all the flavor without turning soggy. Avoid overly soft sandwich bread—it won’t give you those signature crispy bits.
Ingredients for the Crispy Herb Stuffing
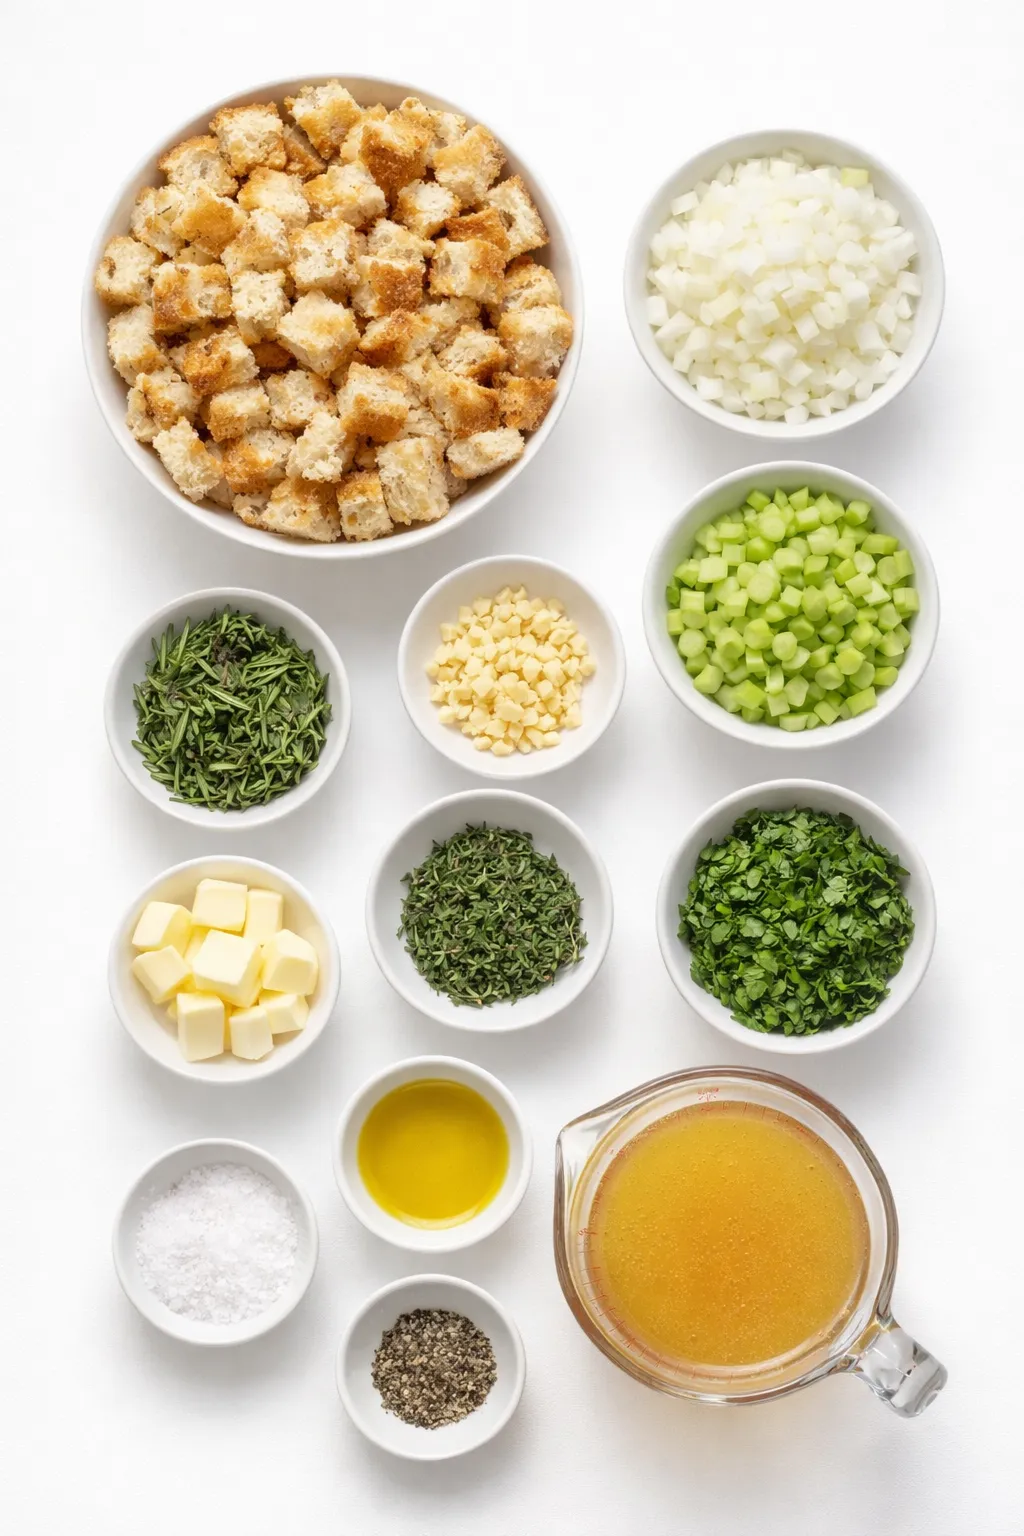
Crusty Bread: The heart of the recipe. Use a day-old loaf for better texture.
Yellow Onions: Brings sweetness and depth as they caramelize during cooking.
Celery: Adds moisture, texture, and an essential aromatic bite.
Garlic: Builds that savory foundation we all crave.
Fresh Herbs (Rosemary, Thyme, Parsley): These bring life and brightness to the dish.
Butter: Richness and that irresistible browning on top.
Vegetable or Chicken Broth: The liquid that moistens the bread without drowning it.
Olive Oil: Used to crisp up the bread and deepen the flavor.
Salt & Pepper: Essential for seasoning everything to perfection.
How To Make the Crispy Herb Stuffing
Step 1: Dry the Bread
Cut your crusty bread into 1-inch cubes and spread them out on a baking sheet. Dry them in a 300°F (150°C) oven for about 20-25 minutes until golden and crisp. Let cool.
Step 2: Sauté the Aromatics
In a large skillet, melt butter with a bit of olive oil over medium heat. Add chopped onions and celery, cooking until softened and slightly caramelized—about 10-12 minutes. Add minced garlic and stir for another minute.
Step 3: Add the Herbs
Stir in chopped rosemary, thyme, and parsley. Let the herbs bloom in the warm pan for about 2 minutes, releasing all their essential oils and aroma.
Step 4: Combine Everything
In a large mixing bowl, toss together the toasted bread cubes and sautéed mixture. Pour in warm broth slowly, tossing gently to combine. The bread should be moist but not soggy. Season with salt and black pepper.
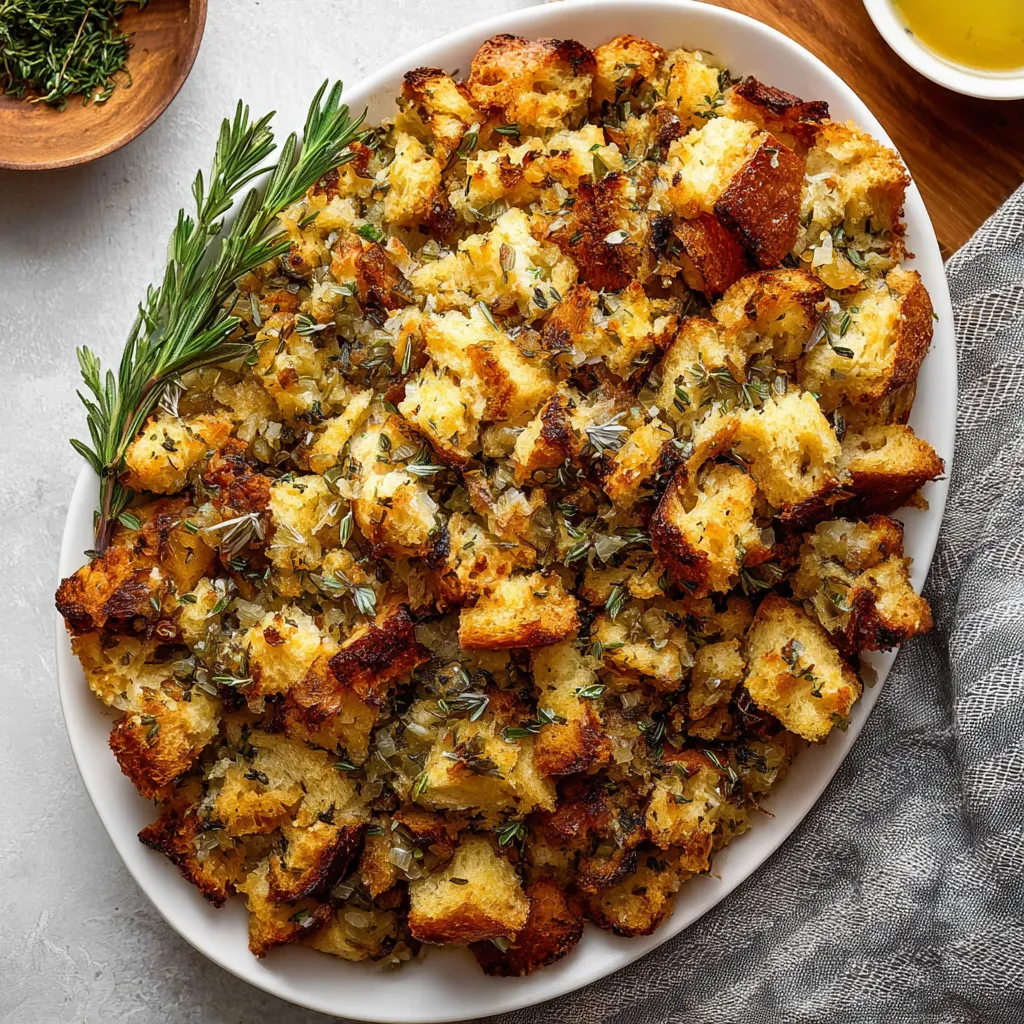
Step 5: Bake to Crispy Perfection
Transfer stuffing to a greased 9×13-inch baking dish. Drizzle with a bit of olive oil. Bake uncovered at 375°F (190°C) for 35-40 minutes, until the top is golden brown and crisp. For extra crunch, broil the top for 1-2 minutes at the end.
How to Serve Crispy Herb Stuffing
This stuffing is hearty enough to hold its own next to roast chicken, turkey, or even a meatless main like stuffed squash. It feeds 8 people as a side dish and can easily be doubled for bigger gatherings.
How to Store Crispy Herb Stuffing
Let the stuffing cool completely, then transfer to an airtight container. It will keep in the refrigerator for up to 4 days. To reheat and maintain the crisp texture, warm it uncovered in a 350°F oven for 10-15 minutes. For freezing, store in freezer-safe bags and reheat directly from frozen.
Frequently Asked Questions
1. Can I make this stuffing gluten-free?
Yes! Just substitute with your favorite gluten-free crusty bread.
2. What broth should I use?
Both chicken and vegetable broths work well—use whatever matches your main dish.
3. Can I add sausage or mushrooms?
Absolutely. Brown them with the onions and celery in Step 2 for a flavorful twist.
4. Should I cover the stuffing while baking?
No. Leaving it uncovered gives you that beautiful crispy top. If it browns too quickly, tent loosely with foil.
5. Can I prep it ahead of time?
Yes! You can assemble the stuffing up to a day in advance. Just cover and refrigerate, then bake when ready.
Want More Side Dish Ideas?
If you love this Crispy Herb Stuffing, check out these equally cozy and delicious recipes:
- Mama’s Cornbread Dressing
- Rustic No-Knead Rosemary Garlic Bread
- Roasted Beets and Carrots with Burrata Salad
- Creamy Corn Casserole
- Crispy Oven Roasted Cauliflower
Save This Pin For Later
📌 Save this recipe to your Pinterest dinner board so you can come back to it any time: Mad For Meals on Pinterest
And let me know in the comments how yours turned out. Did you go all rosemary or mix it up? Did your top crisp just right? I love hearing how others bring their own touch to these dishes. Let’s cook and share better, together!
Print Crispy Herb Stuffing
- Total Time: 1 hour
- Yield: 8 servings
- Diet: Vegetarian
Description
Golden, crunchy, and deeply aromatic, this Crispy Herb Stuffing is not just a side dish—it’s the kind of recipe that quietly steals the spotlight at any table. With rustic bread cubes toasted to perfection, caramelized onions, and an infusion of fresh herbs, each bite is a savory celebration of texture and flavor. Whether you’re after a quick dinner idea, healthy side, or just comforting food with crispy edges, this easy recipe is your go-to.
Ingredients
8 cups crusty bread, cut into 1-inch cubes
2 yellow onions, diced
3 celery stalks, chopped
4 cloves garlic, minced
2 tablespoons fresh rosemary, chopped
2 tablespoons fresh thyme, chopped
2 tablespoons fresh parsley, chopped
6 tablespoons unsalted butter
1 tablespoon olive oil
2 cups vegetable or chicken broth, warmed
1 teaspoon salt
1 teaspoon ground black pepper
Instructions
1. Preheat your oven to 300°F (150°C). Spread the bread cubes on a baking sheet and bake for 20–25 minutes, stirring halfway through, until dried and slightly golden. Let cool.
2. In a large skillet over medium heat, melt the butter and add olive oil. Sauté onions and celery for 10–12 minutes until softened and starting to caramelize.
3. Add minced garlic and cook for 1 more minute until fragrant.
4. Stir in rosemary, thyme, and parsley. Let them cook for 2 minutes to release flavor.
5. In a large bowl, combine toasted bread and sautéed aromatics. Gradually pour in warm broth, tossing gently to combine. Add salt and pepper.
6. Transfer the mixture to a greased 9×13-inch baking dish. Drizzle with extra olive oil.
7. Bake uncovered at 375°F (190°C) for 35–40 minutes until the top is golden brown. Broil for 1–2 minutes at the end for extra crispiness.
Notes
For extra crunch, broil the stuffing for the last 2 minutes.
Use day-old bread for best texture—it soaks without becoming mushy.
Feel free to swap in other herbs like sage or marjoram to fit your meal.
- Prep Time: 20 minutes
- Cook Time: 40 minutes
- Category: Side Dish
- Method: Baking
- Cuisine: American
Nutrition
- Serving Size: 1 cup
- Calories: 210
- Sugar: 3g
- Sodium: 480mg
- Fat: 10g
- Saturated Fat: 5g
- Unsaturated Fat: 4g
- Trans Fat: 0g
- Carbohydrates: 27g
- Fiber: 2g
- Protein: 4g
- Cholesterol: 20mg
Keywords: crispy stuffing, Thanksgiving sides, easy dinner, healthy snack, bread stuffing