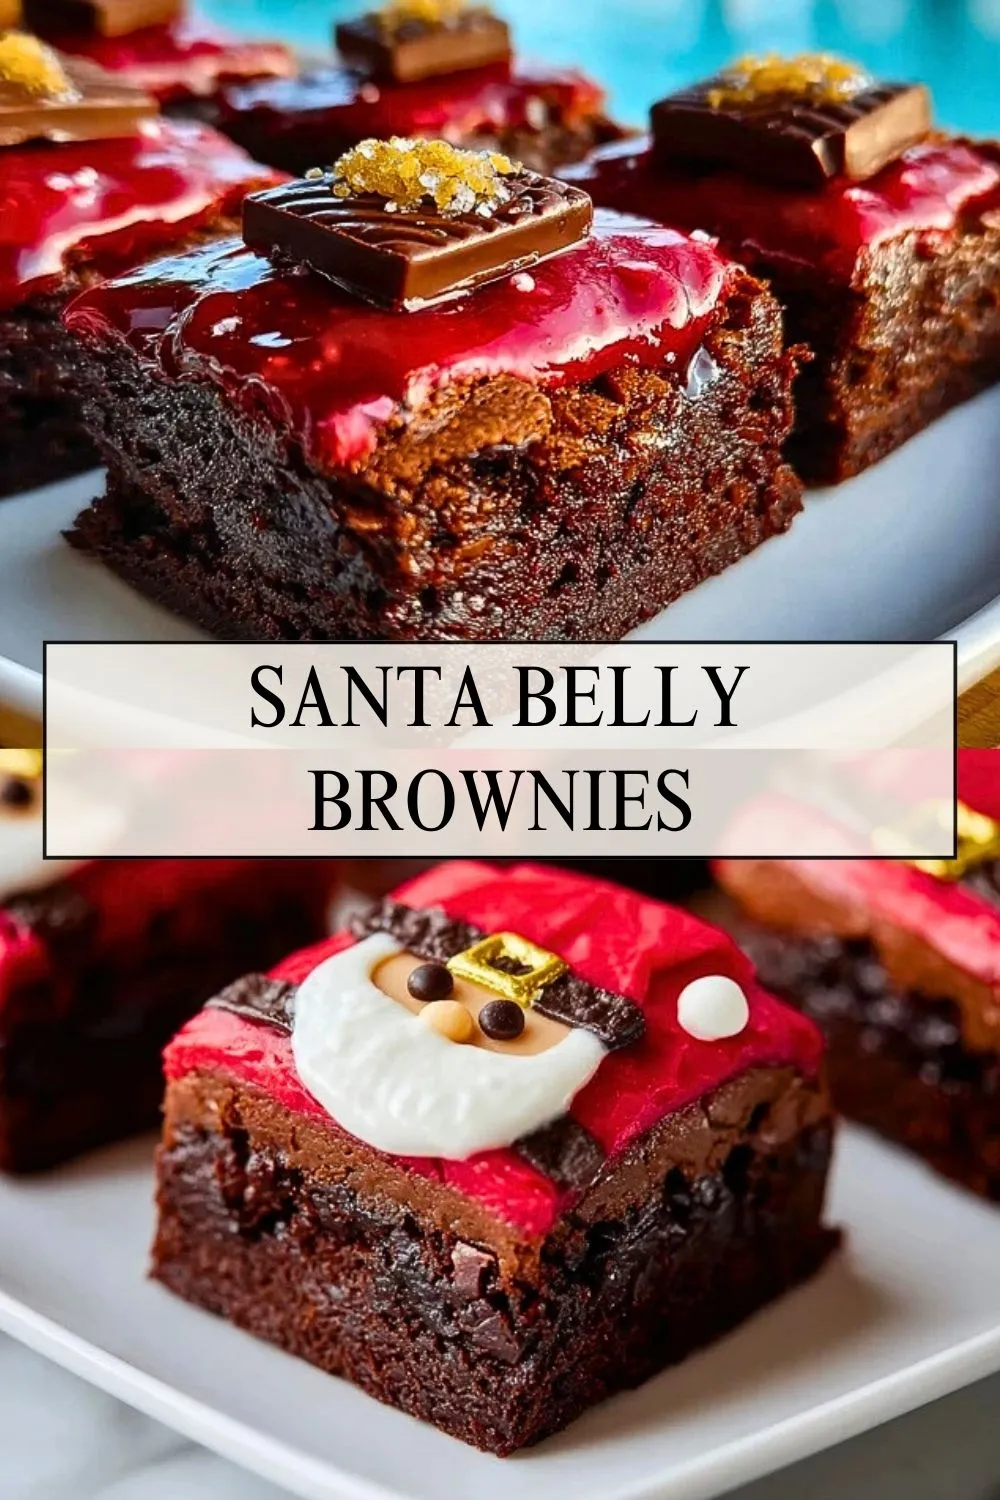
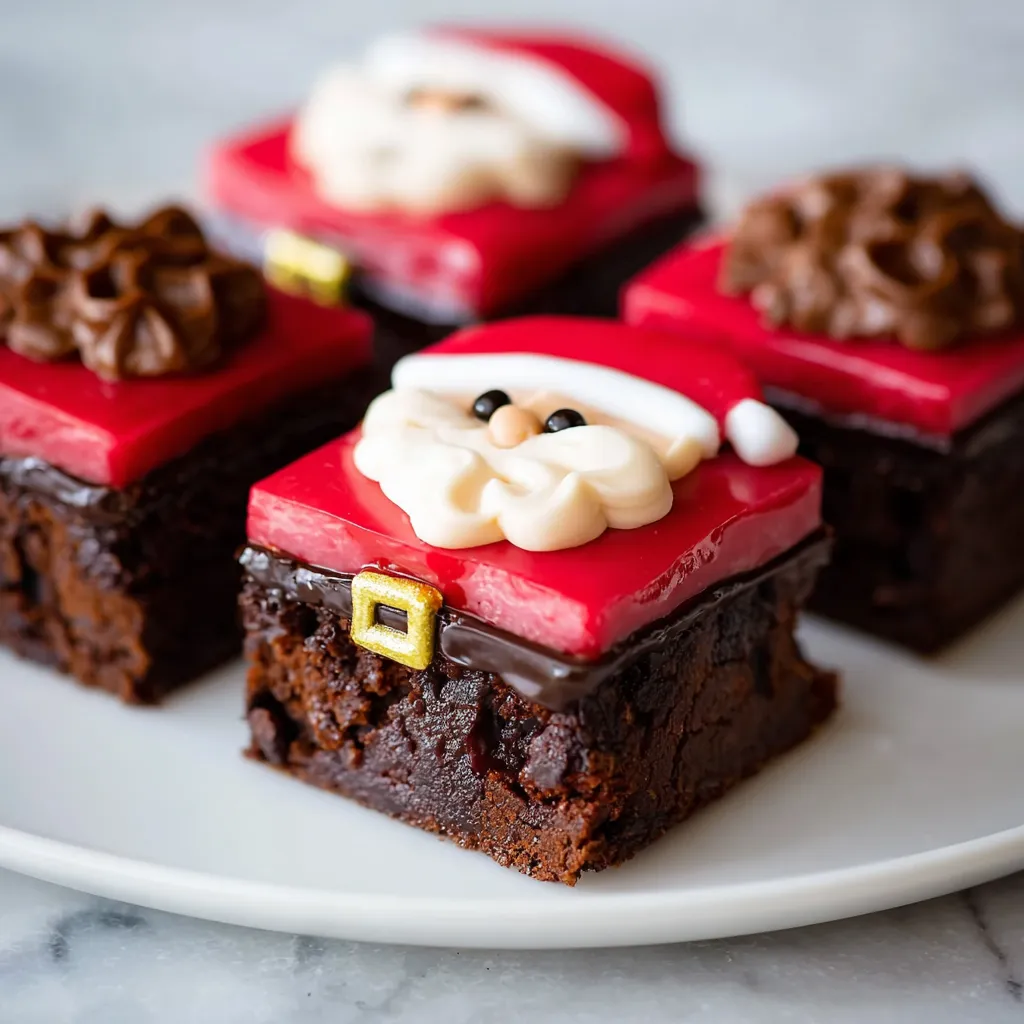
These Santa Belly Brownies look like they marched straight off the North Pole dessert table. You get a thick, fudgy brownie base, a layer of silky chocolate, and a shiny red top that turns each square into Santa’s outfit—complete with belt, buckle, and a jolly little face.

They’re fun enough to impress at any Christmas party, but simple enough to make with kids on a cozy December afternoon. Bake a pan once, then decorate together with candy melts and buttercream for the kind of memory-making recipe you’ll want to bring back every holiday season.
Why You’ll Love These Santa Belly Brownies
If you’re looking for a holiday dessert that actually disappears from the tray, this is it. The brownies themselves are rich, chewy, and deeply chocolatey—more like a bakery-style fudge brownie than a boxed mix. The layers on top add just enough sweetness and texture without making them cloying.
Visually, they’re a total show-stopper. The red tops and little belts make them perfect for cookie exchanges, classroom parties, or Christmas Eve dessert boards. Because everything starts with a single 9×9 pan, they’re also much easier than decorating individual cookies, but you still get that playful, decorated-dessert vibe.
What Kind of Brownie Base Works Best for Santa Belly Brownies?
A dense, fudgy brownie works best here. You want a brownie sturdy enough to support the ganache and candy layers, but still soft when you bite in. A higher ratio of butter and chocolate to flour keeps the texture moist instead of cakey, and a mix of cocoa powder plus chocolate chips delivers deep flavor.
It’s also important to bake the brownies in a metal pan lined with parchment. Metal helps the brownies bake evenly with chewy edges, and the parchment sling lets you lift the whole slab out in one piece so you can cut clean, square Santas once everything is decorated.
Ingredients for Santa Belly Brownies
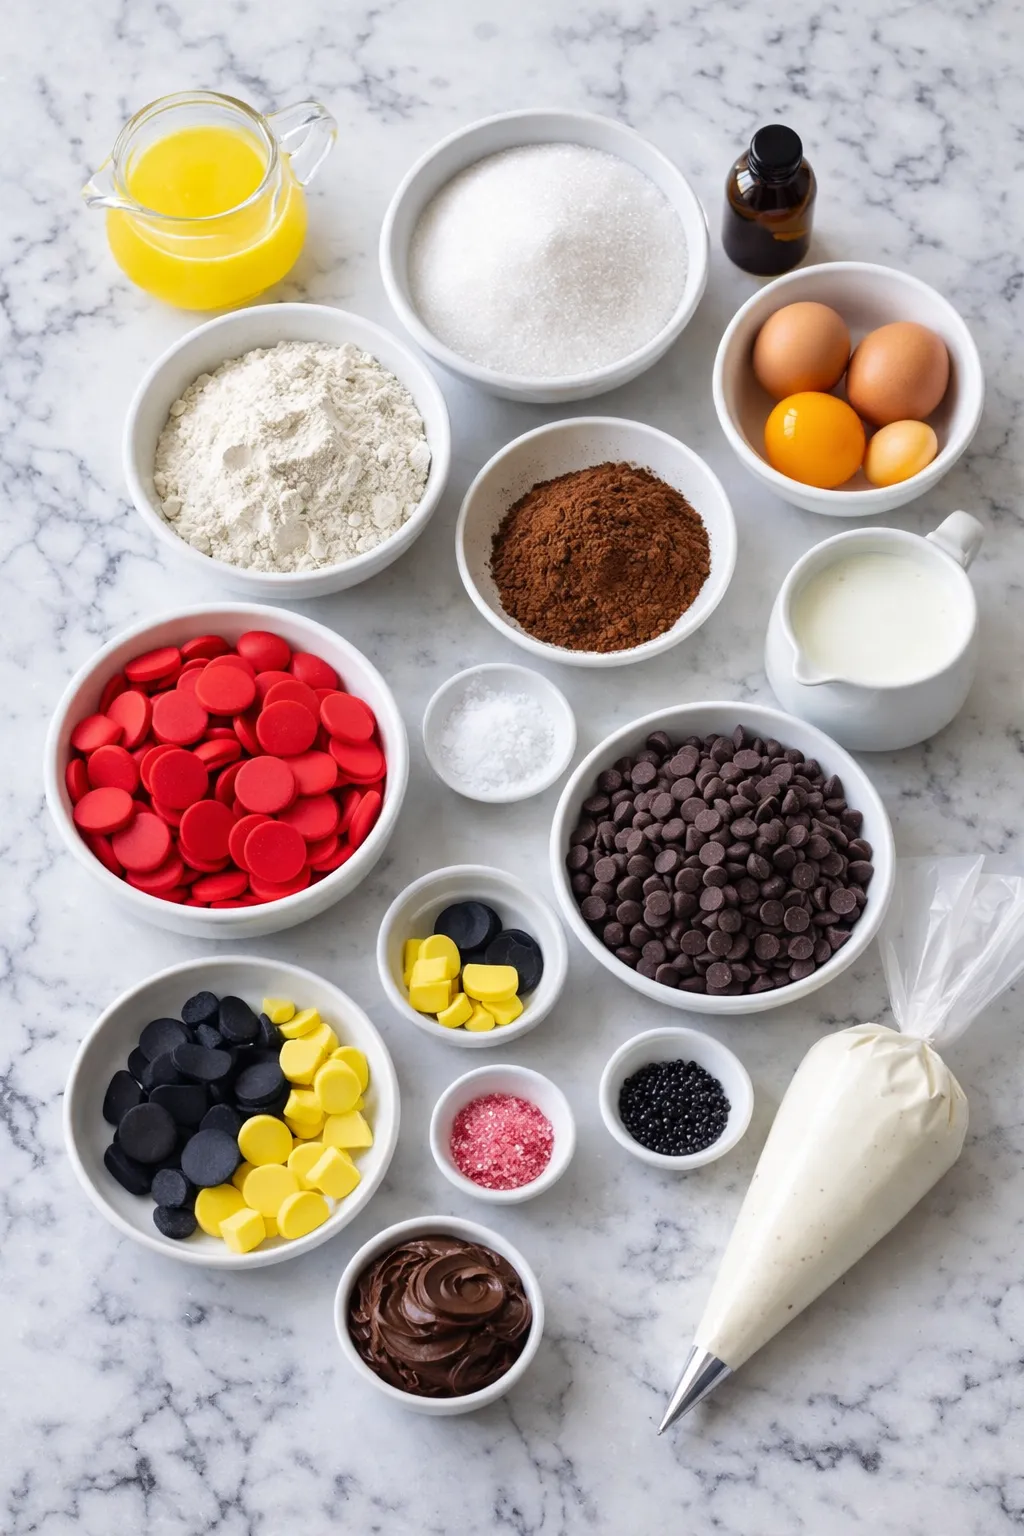
For these Santa Belly Brownies, we build flavor and texture in layers: a fudgy base, a smooth chocolate ganache, and a red candy top with simple decorations. Below is what you’ll need; quantities will be listed in the printable recipe card.
For the brownie layer
- Unsalted butter
- Granulated sugar
- Large eggs and an extra egg yolk
- Vanilla extract
- All-purpose flour
- Unsweetened cocoa powder
- Fine sea salt
- Semi-sweet chocolate chips
For the chocolate ganache layer
- Semi-sweet chocolate chips
- Heavy cream
For the red Santa tops and decorations
- Red candy melts (or white chocolate chips plus red gel food coloring)
- Neutral oil such as vegetable or coconut oil
- Black candy melts or black fondant for belts
- Yellow candy melts or yellow fondant for buckles
- White buttercream or decorator icing for Santa beards and hat trim
- Chocolate frosting for swirl-topped brownies (optional)
- Black pearl sprinkles for eyes
- Pink icing or sanding sugar for Santa noses (optional)
How To Make Santa Belly Brownies
This recipe comes together in three main stages: baking the brownie base, adding the chocolate and red layers, and decorating each square to look like Santa’s belly. Give yourself enough time for cooling between stages so each layer stays neat.
Step 1: Prepare the Pan and Preheat the Oven
Line a 9×9-inch metal baking pan with parchment paper, leaving some overhang on two sides to lift out the brownies later. Lightly grease the parchment and any exposed sides of the pan. Preheat your oven so it’s fully hot by the time the batter is ready.
Step 2: Mix the Fudgy Brownie Batter
Whisk the melted butter and sugar together until glossy and combined, then whisk in the eggs, extra yolk, and vanilla until the mixture is thick and slightly lightened. In a separate bowl, combine the flour, cocoa powder, and salt, then fold the dry ingredients into the wet just until no dry streaks remain. Stir in the chocolate chips to make the brownies ultra chocolatey.
Step 3: Bake and Cool the Brownies
Spread the batter evenly in your prepared pan, smoothing the top. Bake until the edges are set and a toothpick inserted near the center comes out with moist crumbs. Let the pan cool on a wire rack until the brownies are just warm, then chill briefly so the ganache will set cleanly on top.
Step 4: Make and Spread the Chocolate Ganache
Warm the heavy cream until it’s steaming, then pour it over the chocolate chips. Let it sit for a minute before whisking until smooth and shiny. Spread the ganache over the cooled brownies in an even layer. Chill again until the ganache is firm enough to support the red candy layer.
Step 5: Add the Red Santa Top Layer
Melt the red candy melts with a little neutral oil until smooth and pourable. Gently spread this over the chilled ganache, working quickly so it stays glossy and even. Tap the pan on the counter to pop any air bubbles, then chill once more until the red layer is completely set.
Step 6: Cut Into Squares
Use the parchment sling to lift the entire slab of brownies out of the pan and onto a cutting board. With a long, sharp knife, cut the brownies into even squares, wiping the blade clean between cuts to keep the sides neat.
Step 7: Decorate with Belts, Buckles, and Santa Faces
Melt the black candy melts and pipe or drizzle a belt band horizontally across the center of each brownie. Add small yellow squares or rectangles in the center for buckles. On some squares, pipe white buttercream beards and hat trim, add black pearl sprinkle eyes, and finish with tiny pink noses. On others, you can swirl chocolate frosting on top for variety, just like a mixed Santa dessert tray.
Serving Santa Belly Brownies
These Santa Belly Brownies are surprisingly rich, so smaller squares go a long way. A 9×9-inch pan will comfortably make about 16 Santa brownies, which is perfect for serving 8 people with two pieces each or up to 16 guests if you’re building a dessert sampler.
Serve them slightly chilled or at cool room temperature so the layers stay defined but the brownies are still soft. They look beautiful arranged on a white platter or cake stand, especially when paired with other red-and-white treats on a Christmas dessert board.
Storing Santa Belly Brownies
Because of the ganache and candy layers, these brownies store really well and are ideal for make-ahead holiday baking.
At cool room temperature, they’ll keep for about 2 days in an airtight container, layered between sheets of parchment so the decorations don’t smudge. For longer storage, refrigerate them for up to 5 days; let the brownies sit out for 15–20 minutes before serving so the texture relaxes.
You can also freeze Santa Belly Brownies. Chill them first so the tops are firm, then wrap each square tightly in plastic wrap and place in a freezer-safe container. Freeze for up to 2 months. Thaw overnight in the fridge or at room temperature for about an hour, then unwrap and serve. Wait to add delicate details like eyes and noses until after thawing for the neatest results.
Frequently Asked Questions
Can I use a boxed brownie mix instead of homemade brownies?
Yes, you can absolutely start with a boxed mix if you’re short on time. Bake the brownies in a 9×9-inch pan so they’re thick enough to support the layers, and let them cool completely before adding the ganache and red candy top. The homemade base does give deeper flavor and a chewier texture, but the decorations will still look adorable on a mix.
Do I have to use candy melts for the red layer?
Candy melts are the easiest option because they set up firmly and come in bright red, but you can use white chocolate chips with oil-based or gel food coloring instead. Avoid liquid food coloring, which can cause the chocolate to seize. Whatever you use, mix in a little neutral oil so the layer spreads smoothly.
How far in advance can I make Santa Belly Brownies?
You can bake the brownie base and add the ganache up to 2 days in advance, keeping the pan covered in the fridge. Add the red candy layer and decorations the day you plan to serve for the freshest look. Fully decorated brownies also hold well overnight in the refrigerator if needed.
What if I don’t have piping bags for decorating?
No problem—just spoon the melted candy into small zip-top bags and snip a tiny corner to pipe the belts and buckles. For the beards and hat trim, you can use the same bag method with buttercream, or simply dollop and swirl the icing with a small offset spatula for a more rustic look.
Can I double the recipe for a crowd?
Yes. Double all of the ingredients and bake the brownies in a 9×13-inch pan. Keep an eye on the bake time; the larger pan may need a few extra minutes. Once cooled and layered, cut into smaller squares so you still get that cute Santa belly effect without the portions being too big.
Want More Christmas Dessert Ideas?
If decking out your dessert table with Santa Belly Brownies made you smile, you’ll probably love these other festive treats too:
- Try these extra-loaded Rocky Road Brownies when you want marshmallows, nuts, and chocolate in every bite.
- Layered, creamy, and full of cookies, this Christmas Cookie Lasagna is a no-fuss showpiece for holiday parties.
- Bake a batch of Candy Cane Cookies to bring classic peppermint flavor to your cookie trays.
- For bite-sized truffles that taste like cheesecake and pumpkin pie in one, whip up these Pumpkin Pie Cheesecake Truffles.
Mix and match a few of these desserts with your Santa Belly Brownies for a Christmas spread that feels bakery-level without hours of complicated decorating.
Save This Pin For Later
📌 Save this recipe to your favorite holiday or dessert board on Pinterest so you can find it quickly when December baking season hits.
When you make your batch, let me know how you decorated them—did you go all-in on Santa faces, keep them simple with just belts, or mix and match both styles? Feel free to tweak the colors and candies to fit your own Christmas theme.
I always love seeing how others make these recipes their own. Questions are welcome too—share your tips, swaps, and decorating wins so we can all bake smarter and have more fun in the kitchen.
For even more festive bakes, bar desserts, and cozy holiday food ideas, follow my Mad For Meals Pinterest boards and catch the new recipes as they drop.
Santa Belly Brownies
- Total Time: 90
- Yield: 16 brownies
Description
These Santa Belly Brownies are rich, fudgy holiday brownies topped with glossy chocolate, a bright red layer, and the cutest little Santa belts, making them the perfect easy Christmas dessert recipe for parties, holiday dessert tables, and festive food ideas.
Ingredients
1 cup unsalted butter, melted and slightly cooled
1 3/4 cups granulated sugar
3 large eggs
1 large egg yolk
2 teaspoons vanilla extract
1 cup all purpose flour
3/4 cup unsweetened cocoa powder
1/2 teaspoon fine sea salt
1 cup semi sweet chocolate chips
1 cup semi sweet chocolate chips
1/2 cup heavy cream
12 ounces red candy melts or white chocolate chips tinted with red gel color
2 teaspoons neutral oil such as vegetable or coconut oil
1/2 cup black candy melts or black fondant strips for the belts
1/4 cup yellow candy melts or fondant for the buckles
1 cup white buttercream or decorator icing for the beards and hat trim
2 tablespoons chocolate frosting for non Santa swirl tops (optional)
16 black pearl sprinkles for the eyes
Pink icing or sanding sugar for Santa noses (optional)
Instructions
1. Preheat the oven to 350°F (175°C) and line a 9 x 9 inch metal baking pan with parchment paper, leaving an overhang on two sides to lift the brownies out later. Lightly grease the parchment and any exposed sides of the pan.
2. In a large bowl whisk together the melted butter and granulated sugar until glossy and well combined. Add the eggs, egg yolk, and vanilla and whisk until the mixture is thick and slightly lightened in color.
3. In a separate bowl whisk together the flour, cocoa powder, and salt. Gently fold the dry ingredients into the wet mixture just until no dry streaks remain, then stir in the semi sweet chocolate chips.
4. Spread the brownie batter evenly into the prepared pan and smooth the top. Bake for 25 to 30 minutes, or until the edges are set and a toothpick inserted near the center comes out with a few moist crumbs.
5. Place the pan on a wire rack and let the brownies cool to room temperature, then chill for about 30 minutes so the top is firm before adding the next layer.
6. For the ganache, place the chocolate chips in a heat safe bowl and warm the heavy cream in a small saucepan until steaming but not boiling. Pour the hot cream over the chocolate and let it sit for 1 minute, then whisk until smooth and shiny.
7. Spread the ganache over the cooled brownies in an even layer and chill again until the chocolate is set and no longer soft to the touch.
8. Melt the red candy melts with the neutral oil in a microwave safe bowl in short bursts, stirring until completely smooth and pourable. Gently pour the red coating over the set ganache and tilt the pan to cover the surface in an even layer, tapping lightly on the counter to release air bubbles. Chill until the red layer is completely firm.
9. Use the parchment sling to lift the brownie slab out of the pan and place it on a cutting board. With a long sharp knife cut the brownies into 16 even squares, wiping the blade clean between cuts for the neatest edges.
10. Melt the black candy melts and pipe or drizzle a belt line across the middle of each square. Add small squares or rectangles of yellow candy for belt buckles. Pipe white buttercream beards and hat trim on some squares, add black pearl sprinkles for eyes, and finish with tiny dots of pink icing for noses. Add chocolate frosting swirls to a few brownies if you like a mixed platter, then serve or chill until ready to enjoy.
Notes
Chill each layer before adding the next so the ganache and red candy tops set cleanly and do not blend together.
Use good quality cocoa powder and chocolate chips for the richest flavor in the brownie base.
Decorate just before serving for the freshest look, especially if your kitchen runs warm or humid.
- Prep Time: 40
- Cook Time: 30
- Category: Dessert
- Method: Baking
- Cuisine: American
Nutrition
- Serving Size: 1 brownie
- Calories: 320
- Sugar: 32
- Sodium: 160
- Fat: 17
- Saturated Fat: 10
- Unsaturated Fat: 6
- Trans Fat: 0
- Carbohydrates: 40
- Fiber: 2
- Protein: 4
- Cholesterol: 65
Keywords: Santa belly brownies, Christmas brownies, holiday dessert, easy Christmas dessert, brownie ideas, chocolate brownies, easy recipe, dessert ideas